はじめに
以下の記事で、「”WEBブラウザを操作して、スクレイピングするぞ!(次の1歩)」の記事を書いたんですが、Selenium4では少しお作法が違うようなので、Selenium4に合わせてメモメモしておきます(^o^)
Seleniumの使い方(Selenium4)
環境
- Windows
- anaconda
- python3
- VS code
- Selenium4
インストール
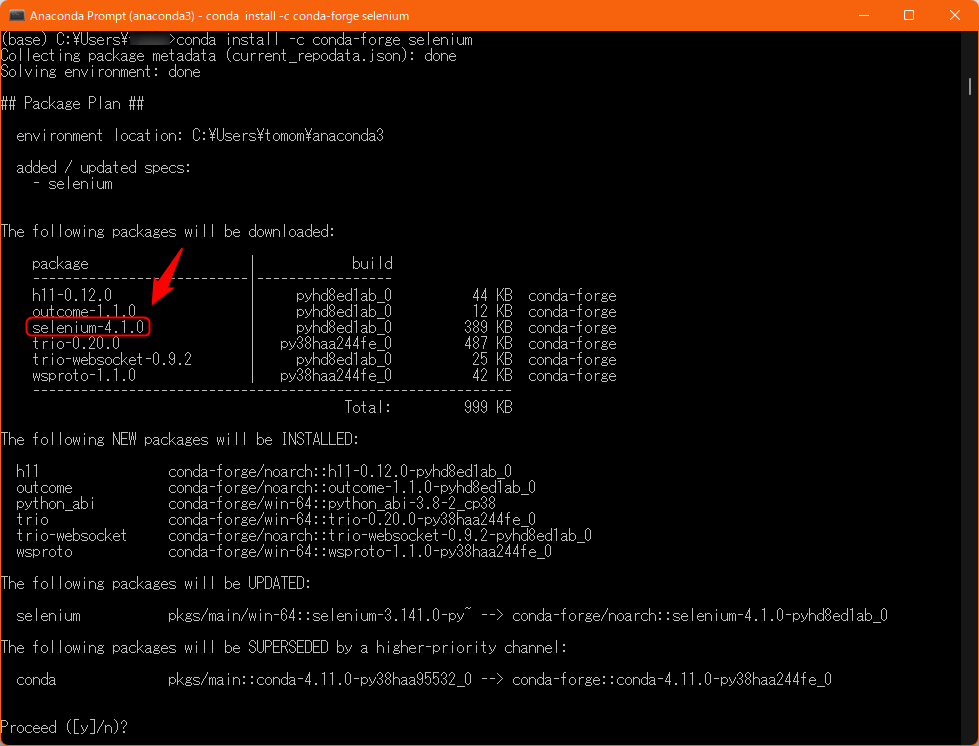
Anacondaのコマンド
conda install -c conda-forge seleniumこれで、インストールするとSelenium4が入ります。
ついでに、chromedriverを自動で更新してくれるやつも
conda install -c conda-forge webdriver-manager便利なやつです。
インポート
from selenium import webdriver
from selenium.webdriver import ChromeOptions
from selenium.webdriver.support.ui import WebDriverWait
from selenium.webdriver.support import expected_conditions as EC
from selenium.webdriver.common.by import By
from selenium.webdriver.common.keys import Keys
from selenium.webdriver.chrome import service as fs
from selenium.webdriver.chrome.service import Service
from webdriver_manager.chrome import ChromeDriverManager
import time
基本的にはこのへんで大丈夫
「By」は要素の指定の時に使います。「find_element_by_*」的なやつじゃなくて、
driver.find_element(By.NAME, ‘****’)
みたいな書き方が推奨らしい。
「fs」はchromedriverを指定するときに使います
chrome_service = fs.Service(executable_path=chromedriverのあるとこのpath)
driver = webdriver.Chrome(service=chrome_service)
って感じで指定する(今回は使ってません)
「WebDriverWait」と「expected_conditions」は、要素が表示されるまでの待機時間の設定に追加います。
WebDriverWait(driver, 10).until(EC.visibility_of_element_located((By.CSS_SELECTOR, selector)))
WebDriverWaitのタイムアウト時間が全部同じでよければ、まとめとくことも出来ます。
wait = WebDriverWait(driver, 10)
wait. until(EC.visibility_of_element_located((By.CSS_SELECTOR, selector)))
明示的な待機における「特定の条件」expected_conditions(EC)のメソッド一覧
| メソッド | 条件 |
|---|---|
| visibility_of_element_located | 指定した要素の表示される |
| text_to_be_present_in_element | 指定したテキストが表示される |
| presence_of_all_elements_located | ページ内のすべての要素が読み込まれる |
| presence_of_element_located | DOM要素内に指定した要素が現れる |
| alert_is_present | Alertが表示される |
| element_to_be_clickable | 要素がクリック出来る状態になる |
この一覧は、単体の要素
複数の要素がある場合
wait. until(EC.visibility_of_all_elements_located(( By.CSS_SELECTOR, selector)))
サンプルコード
スクリプトの書き始めのサンプル
from selenium import webdriver
from selenium.webdriver import ChromeOptions
from selenium.webdriver.support.ui import WebDriverWait
from selenium.webdriver.support import expected_conditions as EC
from selenium.webdriver.common.by import By
from selenium.webdriver.common.keys import Keys
from selenium.webdriver.chrome import service as fs
from selenium.webdriver.chrome.service import Service
from webdriver_manager.chrome import ChromeDriverManager
import time

options = webdriver.ChromeOptions()
options.headless = True                         #ヘッドレスモードの場合指定
serv = Service(ChromeDriverManager().install()) #driverの自動更新
driver = webdriver.Chrome(service=serv, options=options)
wait = WebDriverWait(driver, 10)                 #タイムアウト時間の設定

# URLにアクセス
driver.get(url)
HTML要素の指定方法
HTML要素の指定は、いくつか方法があります。
代表的なものは下記です。
- tag名による指定
- id属性による指定
- class属性による指定
- name属性による指定
- CSSセレクターによる指定
- XPathによる指定
上の4つ(tag・id・class・name)は基本的には使い方は変わりません。
HTMLのタグにつけられているそれぞれのタグ名や属性を指定することによって要素を指定します。
※CSSセレクターと、XPathについては、別記事で改めます!
タグや属性を調べるには、ブラウザが搭載しているデベロッパーツール的なものを使うと簡単です。
大体は、ブラウザを開いて「F12」を押したら出てきます。
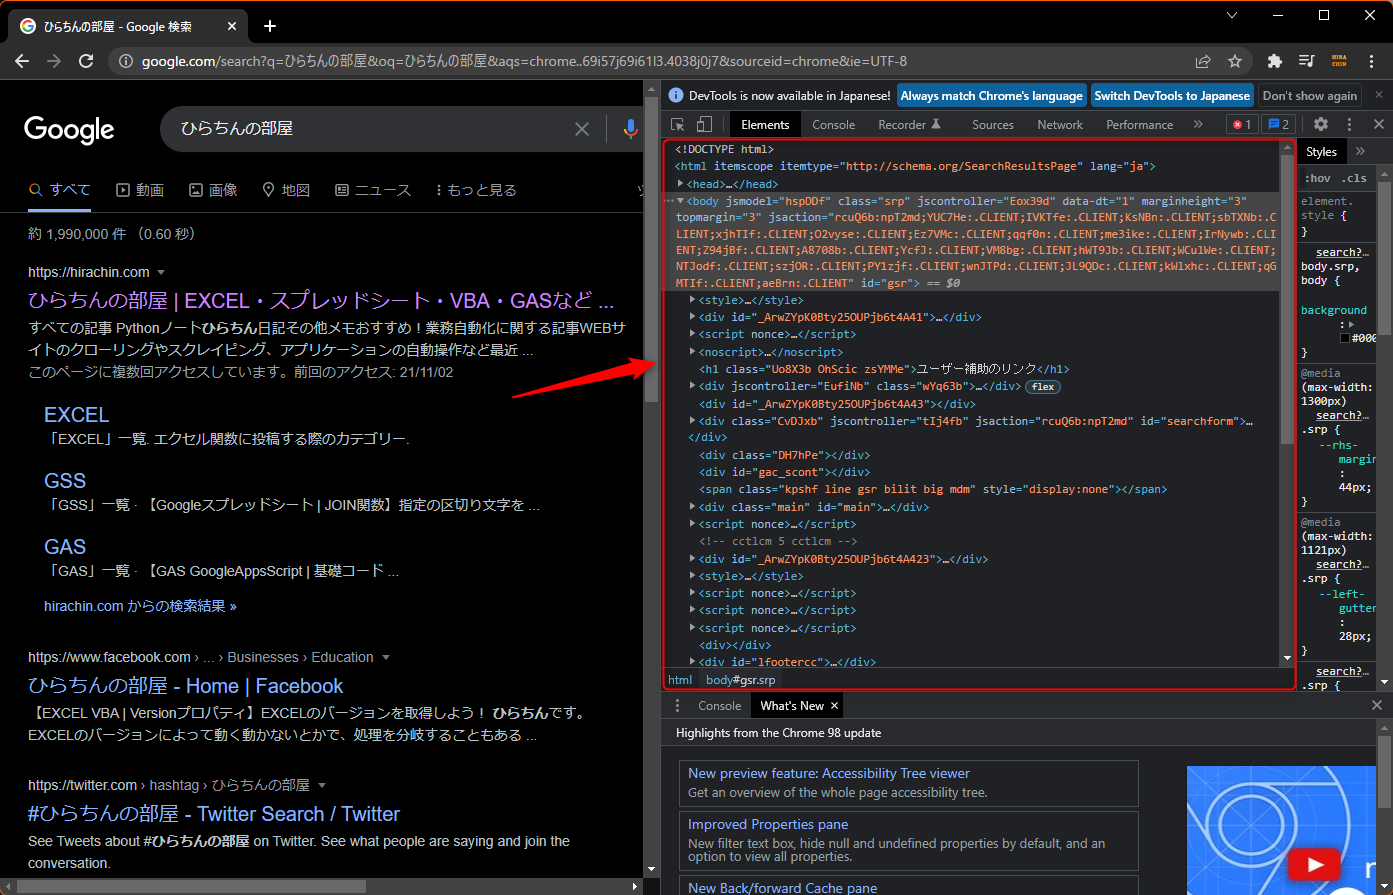
右側に、HTMLが表示されたと思います。
タグは、<body>とか<head>とか<html>とか<span>とか<div>とかそういうやつです。

属性は次の図のような、タグの中にある「id=”******”」や「class=”*******”」みたいに書いてあるところです。
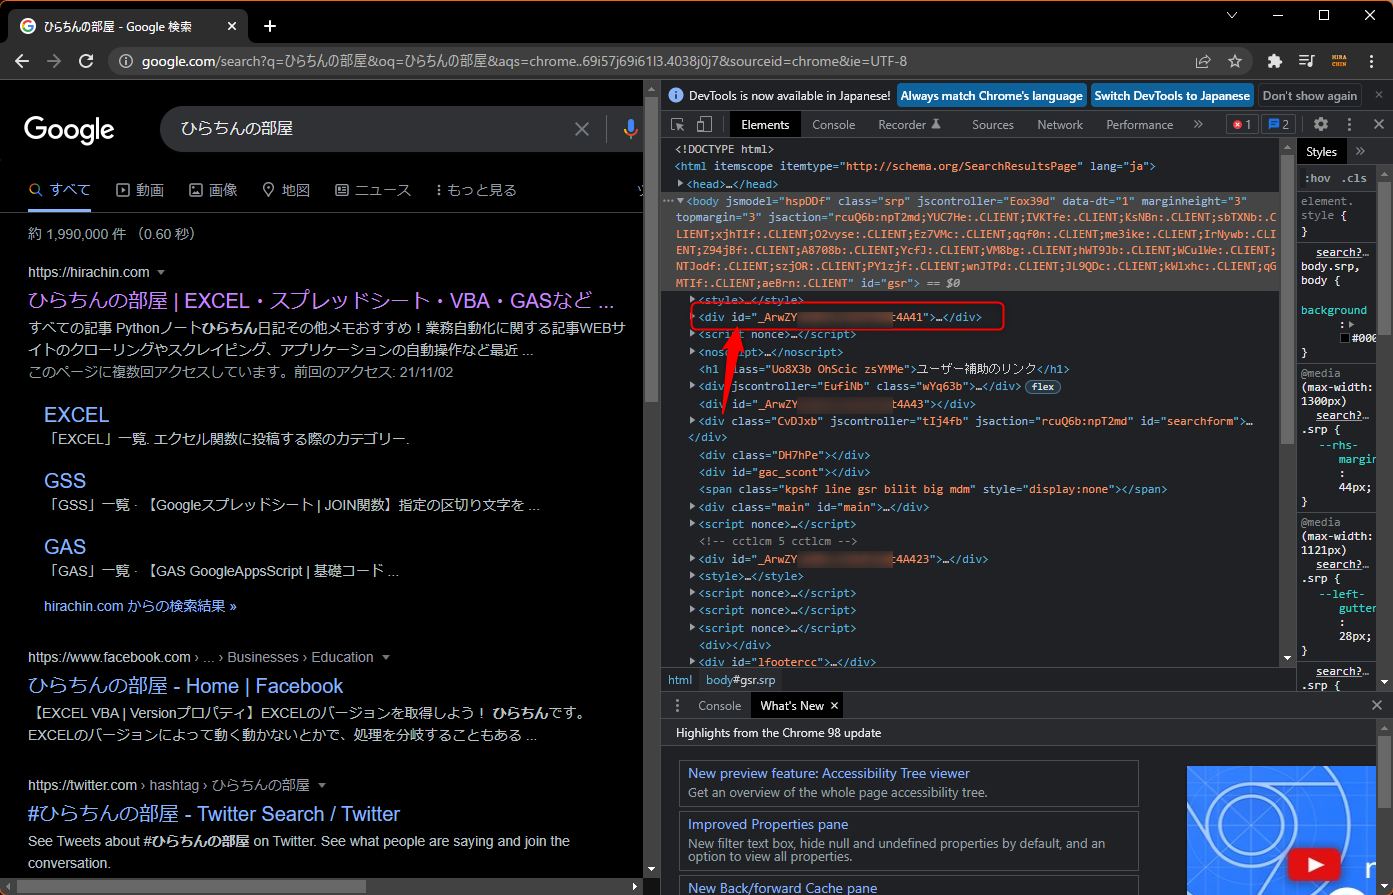
次の図の矢印の場所にあるボタンを押して、ページ上にマウスカーソルを持っていって、調べたい場所をクリックするとHTML上のタグの場所が分かります。
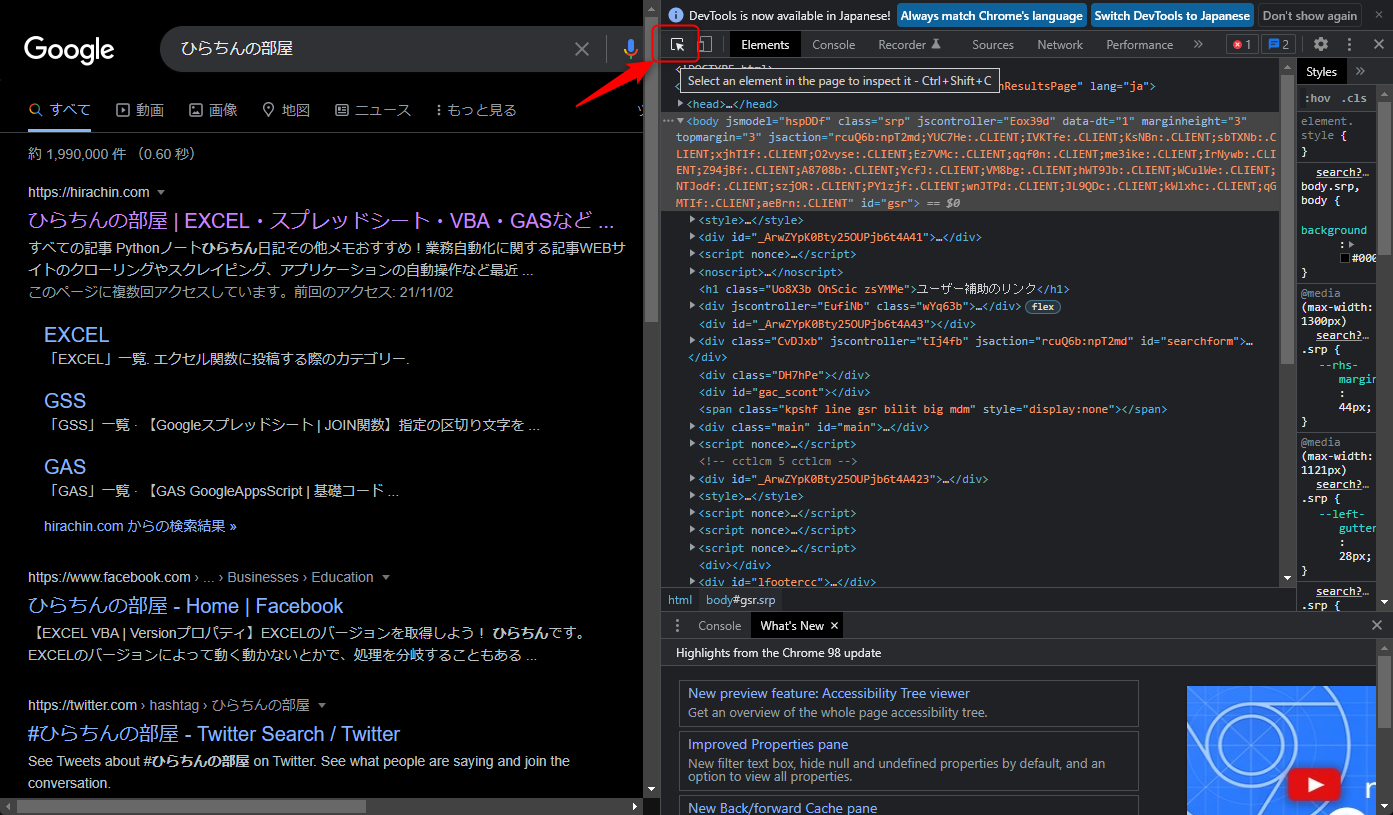
EXCELというテキストがある場所をポチッとしてみます。
デベロッパーツール側で、該当の要素がハイライトされます。
はい。
各要素を取得する場合のメソッドはこちらです。
| 指定方法 | メソッド |
|---|---|
| tag | find_element(by=By.TAG_NAME, value=”tag”) |
| id | find_element(by=By.ID, value=’id’) |
| class | find_element(by=By.CLASS_NAME, value=”class”) |
| name | find_element(by=By.NAME, value=”name”) |
※「by=」「value=」は省略出来ます。「find_element(By.ID, ‘id’)」でOK
ちなみに、このメソッドは、tagやそれぞれが1つしか無い場合の指定の方法です。
複数の場合は、”elements“と複数系に変えます。
| 指定方法 | メソッド |
|---|---|
| tag | find_elements(by=By.TAG_NAME, value=”tag”) |
| class | find_elements(by=By.CLASS_NAME, value=”class”) |
| name | find_elements(by=By.NAME, value=”name”) |
※idはそもそも1つしかないので複数系はありません。
では、どんな感じで取得するか実際にやってみます。
先程のページ「ひらちんの部屋」で検索されているページの<h3>タグを指定して取得しましょう。
from selenium import webdriver
from selenium.webdriver import ChromeOptions
from selenium.webdriver.support.ui import WebDriverWait
from selenium.webdriver.support import expected_conditions as EC
from selenium.webdriver.common.by import By
from selenium.webdriver.common.keys import Keys
from selenium.webdriver.chrome import service as fs
from selenium.webdriver.chrome.service import Service
from webdriver_manager.chrome import ChromeDriverManager
import time

options = webdriver.ChromeOptions()
#options.headless = True                         #ヘッドレスモードの場合指定
serv = Service(ChromeDriverManager().install()) #driverの自動更新
driver = webdriver.Chrome(service=serv, options=options)
wait = WebDriverWait(driver, 10)                 #タイムアウト時間の設定

# Google先生を開く(”ひらちんの部屋”で検索した後のページ)
url = r"https://www.google.com/search?q=%E3%81%B2%E3%82%89%E3%81%A1%E3%82%93%E3%81%AE%E9%83%A8%E5%B1%8B&oq=%E3%81%B2%E3%82%89%E3%81%A1%E3%82%93%E3%81%AE%E9%83%A8%E5%B1%8B&aqs=chrome..69i57j69i61l3.4038j0j7&sourceid=chrome&ie=UTF-8"
driver.get(url)

# h3タグを取得する(複数あるからelementsで)
els = driver.find_elements(By.TAG_NAME, 'h3')

# テキスト出力する
for el in els:
    print(el.text)
”driver.get”までは前回やりましたね😁
【Python | Selenium】”WEBブラウザを操作して、スクレイピングするぞ!(初めの1歩)
その次の
els = driver.find_elements(By.TAG_NAME, 'h3')の部分で、h3タグを取得しています。このページには複数のh3タグがあるので、複数形で取得しています。
ちゃんと取れてるか確認するために、その後で取得したh3タグのページ上で表示されているテキストを順番に出力しています。
※取得した単一の要素に.textを続けることでページで表示されているテキストが取得出来ます。
では実際に動かしてみましょう。
ひらちんの部屋 | EXCEL・スプレッドシート・VBA・GASなど …
EXCEL
GAS
GSS
ひらちんの部屋 – Home | Facebook
#ひらちんの部屋 – Twitter Search / Twitter
「#ひらちんの部屋」のYahoo!リアルタイム検索 – Twitter …
hirachin.com ▷ ひらちんの部屋 | 初心者でも絶対にわかる丁寧 …
こんな感じで出ましたね(^o^)
idやclassも基本的には同じ使い方です。
取得した要素に対して操作指示をする
先程、「.text」でページ上のテキストを取得しましたが、取得したエレメントに対しての操作指示は他にもあります。
基本的なものをあげておきます。
| 指示 | メソッド | 備考 |
|---|---|---|
| クリック | .click() | 押せる要素に対して |
| ドロップダウンを選択する | .select_by_index(indexnum) | Select要素に対してindexで選択 |
| ドロップダウンを選択する | .select_by_value(“value”) | Select要素に対してvalueで選択 |
| ドロップダウンを選択する | .select_by_visible_text(“text”) | Select要素に対して表示されているテキストで選択 |
| テキストを入力する | .send_keys(“strings”) | 入力ボックスに対して |
| テキストを取得する | .text | |
| 属性の値を取得する | .get_attribute(“value”) | “value”以外にも、取得したい属性名を指定出来る |
これらは、取得した単一のエレメントに対して実行します。elementsで取得した複数の状態には出来ませんのでご注意下さい。
では、ちょっとやってみましょう!
Google先生の検索ボックスに「ひらちんの部屋」とテキストを入力して、「Google 検索」ボタンを押す流れです。
HTMLは次の図のようになっています。
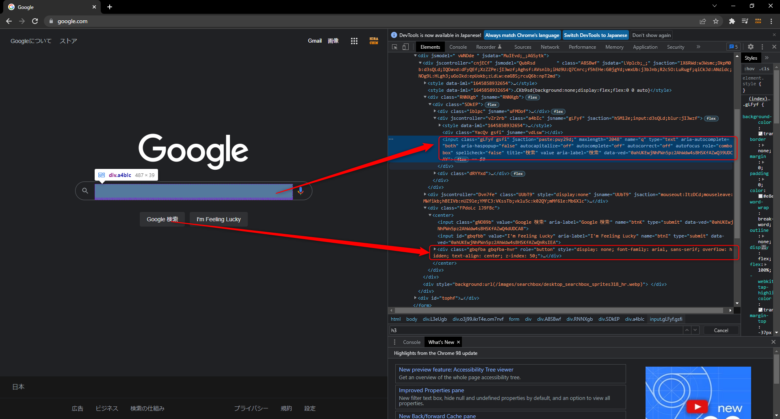
ホントはあんまりこんな指定の仕方はしないですが、検索テキストは、全体のHTMLの構造の中では、inputタグの1番目になっています。
driver.find_elements(By.TAG_NAME ,'input')この形で、すべてのinputタグを取得することが出来ますね。
実は、これに対してIndex指定することで、○番目の要素という指定が出来ます。
1番目の要素は[0]番になりますので、
driver.find_elements(By.TAG_NAME ,'input')[0]とすることで、検索テキストの入力ボックスが指定出来ます。
同じように、「Google 検索」ボタンは、name属性の’btnK’の1番目となっています。
driver.find_elements(By.NAME, 'btnK')[0]このように書くことが出来ます。
コード全体は以下のようになります。
from selenium import webdriver
from selenium.webdriver import ChromeOptions
from selenium.webdriver.support.ui import WebDriverWait
from selenium.webdriver.support import expected_conditions as EC
from selenium.webdriver.common.by import By
from selenium.webdriver.common.keys import Keys
from selenium.webdriver.chrome import service as fs
from selenium.webdriver.chrome.service import Service
from webdriver_manager.chrome import ChromeDriverManager
import time

options = webdriver.ChromeOptions()
#options.headless = True                         #ヘッドレスモードの場合指定
serv = Service(ChromeDriverManager().install()) #driverの自動更新
driver = webdriver.Chrome(service=serv, options=options)
wait = WebDriverWait(driver, 10)                 #タイムアウト時間の設定

# Google先生を開く(”ひらちんの部屋”で検索した後のページ)
url = r"https://www.google.com/"
driver.get(url)

# 検索テキストを入れるボックスの要素を取得
el_search = driver.find_elements(By.TAG_NAME, 'input')[0]

# 検索テキストを入れるボックスに”ひらちんの部屋”と入れる
el_search.send_keys('ひらちんの部屋')

# 「Google 検索」ボタンの要素を取得
wait. until(EC.visibility_of_all_elements_located((By.NAME, 'btnK'))) #これがないと早く進み過ぎちゃうので入れた(待機処理)
el_button = driver.find_elements(By.NAME, 'btnK')[0]

# 「Google 検索」ボタンを押す
el_button.click()
el_search と el_button でそれぞれ、要素を取得しています。
検索テキストを入れるボックスには、そのあと「.send_keys」 でテキストの入力。
「Google 検索」ボタンに対しては、「.click()」でクリックしています。
※ここでは、要素が取得出来てから次に進むように、
wait. until(EC.visibility_of_all_elements_located((By.NAME, ‘btnK’)))
の処理を入れています。
では実際に動作を確認しましょう。
検索ボックスにテキストを入れて、検索するボタンを押すことが出来ました!
まとめ
「次の1歩のその2」ということで、Selenium4での作法に従って書き直しました。ちょこちょこと初めのへんで、便利機能もメモメモしていますが、以降でもっといろんな機能を紹介していきたいと思います!
コメント